My first encounter with digestive biscuits was reading about them in old Agatha Christie novels. I can’t remember which one it was in particular, but there was an office where the staff had digestives with their tea and only on Fridays (or possibly twice a week) did they get chocolate ones. I had no idea what a digestive would be like. Fast forward a decade when I did a study abroad near London and I quickly discovered the magic that is a digestive biscuit, ideally with plain chocolate (never milk). They say that it’s like a US graham cracker, but I find digestives to have a more buttery tender texture and a slight saltiness. And you can’t buy pre-chocolated graham crackers! Though McVities is the most famous brand, I will say that my friend Stacey and I felt that the Sainsbury’s own-brand digestives were even better. They were probably made in the same factory but they were ever-so-slightly different.
Now that I’m firmly back settled in the US, digestives have been a rare and expensive treat. I’ve tried a few recipes over the years but never found one that was anywhere near as good the storebought UK ones. When a food is primarily enjoyed in its packaged form, I do find the reverse-engineer into homemade to be tricky. I got my daughter on the case, as well, and she reviewed the Serious Eats recipe in our newspaper, The Daily Excitement Worldwide. As her review states, we found them mediocre. Last week we tried the King Arthur Flour recipe. I am a big fan of KAF and have loved other of their recipes but this one is a complete clunker. You use room temperature butter and there is no chilling, so the dough was impossible to roll out. You also use icing sugar, which is both bland and gives the completely wrong texture. They were much more like chocolate-covered rich tea biscuits than digestives. Did we happily eat them? Yes! Would we even consider making this recipe again? No!
The whole time I lived in the UK, I never ate a homemade digestive nor did I know of anyone who made them. Why would you when you can buy something delicious at a low price? But when I went searching for a new recipe to try, I went straight to UK sources on the idea that at least they’d have a better idea what they were aiming for. I finally hit upon Felicity Cloake’s recipe in The Guardian. The reason I liked and selected it was because she had done research of a variety of different recipe and went into detail about the choices she made to create her ultimate version. She also used cold butter and got nowhere near the icing sugar.
We made her recipe as-written the first time and they are definitely closer than any we’ve tried so far. My local shop didn’t have dark muscovado so I used light—I figured that would be better than regular dark brown sugar since she goes on about the difference muscovado makes. In a taste test the kids couldn’t really tell the difference between light brown sugar and muscovado and there are only 55g in the whole batch so if all you’ve got is regular light or dark brown sugar, I’d say don’t bother with a special trip to the store (especially if you’re still in lockdown).
We had a few quibbles overall. She calls for medium oatmeal, which I believe translates to rolled oats in the US. I appreciated their flavor, but to me whole rolled oats in a biscuit makes it more like a Hobnob. She also has an odd mixing method. Instead of putting all the dry ingredients together and then cutting in the butter, she has you cut the butter only into the flour and then add the baking soda, salt and sugar. This seemed unnecessary to me and led to some bites tasting saltier than others. I also felt that once the chocolate went on the biscuits, they were missing a bit of tang, so I took a tip from the Serious Eats recipe I’d otherwise rejected and decided to use runny yogurt instead of milk to bring the dough together. I also added a bit more soda and salt.
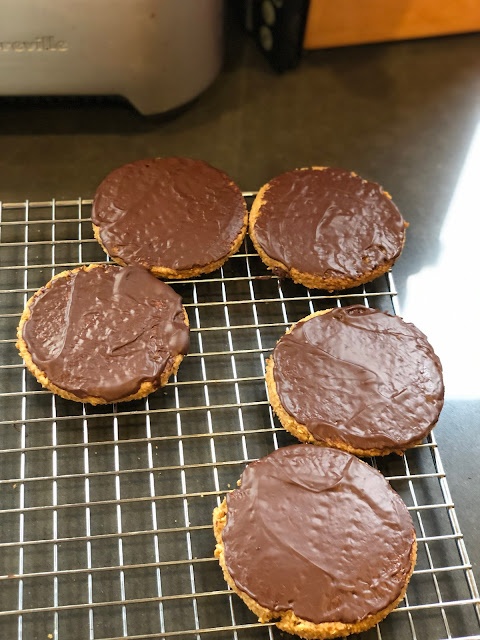
While the end result is not a carbon copy of a McVities, the biscuits are light and crisp and flavorful and more-ish. I want to try using half whole meal spelt flour next time as well as dark brown sugar, but I certainly won’t feel I have to buy them the next time I want to savor of taste of my former home.
INGREDIENTS
85g soft white wheat berries or spelt berries, ground
85g hard red wheat berries, ground
170g rolled oat or steel cut oats, ground into a flour (or the same amount of oat flour)
55g light or dark muscovado or regular brown sugar
Heaping 1/2 tsp baking soda
Heaping 1/2 tsp table salt or fine sea salt
150g cold butter, cut into pieces
2-5 TBSP runny yogurt, milk, or a 1:1 mix of milk and whey
Chocolate for the top, if desired, maybe 100g or so or 200g if you like a thick layer of chocolate
DIRECTIONS
Now that I’m firmly back settled in the US, digestives have been a rare and expensive treat. I’ve tried a few recipes over the years but never found one that was anywhere near as good the storebought UK ones. When a food is primarily enjoyed in its packaged form, I do find the reverse-engineer into homemade to be tricky. I got my daughter on the case, as well, and she reviewed the Serious Eats recipe in our newspaper, The Daily Excitement Worldwide. As her review states, we found them mediocre. Last week we tried the King Arthur Flour recipe. I am a big fan of KAF and have loved other of their recipes but this one is a complete clunker. You use room temperature butter and there is no chilling, so the dough was impossible to roll out. You also use icing sugar, which is both bland and gives the completely wrong texture. They were much more like chocolate-covered rich tea biscuits than digestives. Did we happily eat them? Yes! Would we even consider making this recipe again? No!
The whole time I lived in the UK, I never ate a homemade digestive nor did I know of anyone who made them. Why would you when you can buy something delicious at a low price? But when I went searching for a new recipe to try, I went straight to UK sources on the idea that at least they’d have a better idea what they were aiming for. I finally hit upon Felicity Cloake’s recipe in The Guardian. The reason I liked and selected it was because she had done research of a variety of different recipe and went into detail about the choices she made to create her ultimate version. She also used cold butter and got nowhere near the icing sugar.
We made her recipe as-written the first time and they are definitely closer than any we’ve tried so far. My local shop didn’t have dark muscovado so I used light—I figured that would be better than regular dark brown sugar since she goes on about the difference muscovado makes. In a taste test the kids couldn’t really tell the difference between light brown sugar and muscovado and there are only 55g in the whole batch so if all you’ve got is regular light or dark brown sugar, I’d say don’t bother with a special trip to the store (especially if you’re still in lockdown).
We had a few quibbles overall. She calls for medium oatmeal, which I believe translates to rolled oats in the US. I appreciated their flavor, but to me whole rolled oats in a biscuit makes it more like a Hobnob. She also has an odd mixing method. Instead of putting all the dry ingredients together and then cutting in the butter, she has you cut the butter only into the flour and then add the baking soda, salt and sugar. This seemed unnecessary to me and led to some bites tasting saltier than others. I also felt that once the chocolate went on the biscuits, they were missing a bit of tang, so I took a tip from the Serious Eats recipe I’d otherwise rejected and decided to use runny yogurt instead of milk to bring the dough together. I also added a bit more soda and salt.
While the end result is not a carbon copy of a McVities, the biscuits are light and crisp and flavorful and more-ish. I want to try using half whole meal spelt flour next time as well as dark brown sugar, but I certainly won’t feel I have to buy them the next time I want to savor of taste of my former home.
INGREDIENTS
85g soft white wheat berries or spelt berries, ground
85g hard red wheat berries, ground
170g rolled oat or steel cut oats, ground into a flour (or the same amount of oat flour)
55g light or dark muscovado or regular brown sugar
Heaping 1/2 tsp baking soda
Heaping 1/2 tsp table salt or fine sea salt
150g cold butter, cut into pieces
2-5 TBSP runny yogurt, milk, or a 1:1 mix of milk and whey
Chocolate for the top, if desired, maybe 100g or so or 200g if you like a thick layer of chocolate
DIRECTIONS
- Put all the dry ingredients in the bowl of a food processor (I grind my grains right into the bowl). Pulse a few times to combine. The food processor won’t grind the oats fine enough so I used a coffee grinder dedicated to non-coffee applications—rolled oats don’t work that well in my Fidibus though oat groats or steel cut oats would work)
- Add the butter pieces to the food processor and pulse to combine until it starts to form clumps
- Tip out the mixture into a large bowl and make a well. Drizzle 2 TBSP dairy over your mixture and work it with your hands. Add more yogurt as needed until it forms a cohesive dough that is not too sticky and isn’t too crumbly
- Wrap the dough in plastic wrap and refrigerate for 30 minutes
- About 10 minutes into the dough-resting time, preheat the oven to 350 degrees F. I used the convection setting and prepare two baking trays with parchment or Silpat
- When the resting time is done, roll the dough out between sheets of plastic wrap until it’s about 1/4 inch thick (or whatever thickness you like)
- Use a biscuit cutter of whatever shape(s) or size(s) you like to cut biscuits then put them on the baking tray. They don’t spread so you don’t need a huge amount of space between them
- Reroll any scrap and keep going
- Poke with a fork or toothpick all over each biscuit
- Bake 12-15 minutes or until golden. Go a bit longer if you like a very crisp digestive
- Remove from the oven and let cool 5 minutes on the trays and then remove to a cooling rack
- While the biscuits cool, melt your chocolate. I do it in the microwave at 50% power. I don’t do an official temper of the chocolate because I just don’t care enough but I do throw in some chunks of unmelted chocolate to the melted stuff in a very imprecise fashion
- Traditionally you dunk one flat side of the biscuit in chocolate to coat, but I prefer to put about 1 to 1 1/2 tsp melted chocolate on each one and use a small offset spatula to spread it all over the top
- Set back on the cooling rack and leave to set. Store at room temperature in an airtight container

Comments